For the best experience, follow these tips on how to wear your Fitbit device.
Wrist-based devices
For the infinity band that comes with Fitbit Charge 5, Fitbit Charge 6, Fitbit Sense series, Fitbit Versa 3, and Fitbit Versa 4:
- Slide the bottom band through the first loop in the top band.
- Tighten the band until it fits comfortably, and press the peg through one of the holes in the band.
- Slide the loose end through the second loop until it lies flat on your wrist.
For our other bands, place your device around your wrist, and fasten the clasp.
For any of our wrist-based devices, it’s important to make sure it isn’t too tight. Wear the band loosely enough that it can move back and forth on your wrist.
For step-by-step instructions, choose your device on the Fitbit help site to review the user manual.
Clip-based devices
Securely clip your device with the screen facing outward to your clothing. Confirm your tracker is set to WORN on Wrist (Inspire 3) or On Wrist
(Inspire and Inspire 2) when you wear your tracker on your wrist, and CLIPPED on Body
(Inspire 3) or On Clip
(Inspire and Inspire 2) when you wear your tracker in the clip accessory.
Wrist-based devices
Make sure your wrist setting in the Fitbit app matches the wrist that you wear your device on (dominant or non-dominant). For more information, see How do I change the wrist setting on my Fitbit device?
For more details, review our Wear and Care page and our Product Safety information.
Clip-based devices
Secure the clip, with the screen facing outward, to a shirt pocket, bra, pants pocket, belt, or waistband. Try out a few different locations to see what's most comfortable and secure for you.
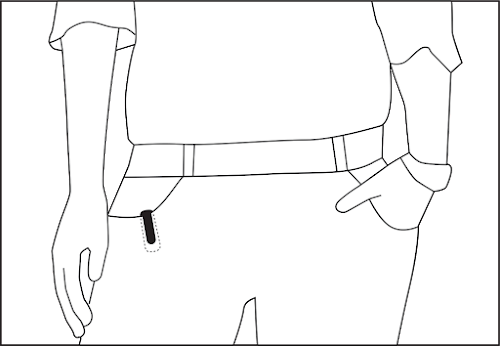
If you experience discomfort or irritation when wearing your device in contact with your skin, clip it to another piece of clothing, such as your belt or pocket.
Fitbit Ace, Fitbit Alta, and Fitbit Alta HR have 2 detachable bands (top and bottom) that you can replace with accessory bands sold separately.
To remove and replace a band:
- Turn over your tracker and find the band latches—there’s one on each end where the band meets the frame.
- To release a latch, press down on the flat metal button on the strap.
- Slide the band up to release it from the tracker.
- Repeat on the other side. If you’re having trouble or if it feels stuck, gently move the band back and forth to release it.
- To attach a band, slide it down on the end of the tracker until you feel it snap into place.
Fitbit Ace 2 has an adjustable band that you can replace with accessory bands sold separately. For larger sizes or different styles, Ace 2 is compatible with Inspire and Inspire HR classic accessory bands.
To remove the band:
- Hold the tracker with the screen facing you and the button on the left.
- Gently push the top of the tracker through the back opening in the band.
To attach a band:
- Hold the tracker with the back facing you and the button on the right.
- Hold the band with the back opening facing you and the button insert on the right.
- Place the top of the tracker into the flexible band opening and gently push the bottom of the tracker into place. Ace 2 is secure when all edges of the band lie flat against the tracker.
Fitbit Ace 3 has an adjustable band that you can replace with accessory bands sold separately. For larger sizes or different styles, Ace 3 is compatible with Inspire 2 classic accessory bands.
To remove the band:
- Hold the tracker with the screen facing you.
- Gently push the top of the tracker through the back opening in the band.
To attach a band:
- Hold the tracker with the back facing you. Make sure the time isn't upside down.
- Hold the band with the back opening facing you and the strap buckle on the top.
- Place the top of the tracker into the flexible band opening and gently push the bottom of the tracker into place. Ace 3 is secure when all edges of the band lie flat against the tracker.
To remove and replace a band:
- Place Blaze face-down on a flat, smooth surface.
- On either side (top or bottom), find the switch where the band meets the frame.
- Use your finger or nail to unlock the switch by gently sliding it to the opposite end. Pull the band away from the frame.
- Grasp the band you want to attach, making sure you choose the right one (top or bottom). The top band has a watch buckle at the end of it. The bottom band has notches.
- To attach the band, find the pin opposite the removal switch and slide it into the hole in the frame.
- Pull the switch while sliding the band into place, then release the switch to lock the band into the frame.
- Repeat on the other side.
Fitbit Charge 2, Fitbit Charge 3, and Fitbit Charge 4 have 2 detachable bands (top and bottom) that you can replace with accessory bands sold separately. To remove and replace the bands on both sides:
- Turn over your tracker and find the band latches—there’s one on each end where the band meets the frame.
- To release a latch, press down on the flat button on the strap.
- Gently pull the band away from the tracker to release it.
- Repeat on the other side. If you’re having trouble or if it feels stuck, gently move the band back and forth to release it.
- To attach a band, press it into the end of the tracker until you feel it snap into place, then repeat on the other side. If you have trouble attaching the band or if it feels loose, gently move the band back and forth to make sure it's attached to the tracker.
Your device has 2 detachable bands (top and bottom) that you can replace with accessory bands sold separately. Note that to switch between small and large bands, only replace the bottom band.
To remove and replace a band:
- Turn over your tracker and find the band latches.
- To release the latch, use your fingernail to press the flat button toward the band.
- Gently pull the band away from the tracker to release it.
- Repeat on the other side.
- To attach a band, press it into the end of the tracker until you hear a click and it snaps into place. The band with the buckle attaches to the top of the tracker.
Fitbit Flex 2 comes with a large and a small band. If you choose the large band, you’ll need to remove the clasp from the small band and put it into the large band:
- Push the clasp out from the inside of the band. You may find it helpful to first remove the square peg and then the round peg.
- Pull out the clasp.
- Insert the clasp into another band by lining up the pegs with their matching holes and pressing firmly until both pegs snap into place.
- If there is a bulge on the inside of the band, find a small object like a credit card to push it flat.
Your device has 2 detachable bands that you can replace with accessory bands sold separately. Note that to switch between small and large bands, only replace the bottom band.
To remove the band:
- Turn over Inspire and find the quick-release lever.
- While pressing the quick-release level inward, gently pull the band away from the tracker to release it.
- Repeat on the other side.
To attach a new band:
- Slide the pin (the side opposite the quick-release lever) into the notch on the tracker. Attach the band with the clasp to the top of the tracker.
- While pressing the quick-release lever inward, slide the other end of the band into place.
- When both ends of the pin are inserted, release the quick release lever.
Fitbit Sense, Fitbit Sense 2, Fitbit Versa 3, and Fitbit Versa 4 have 2 detachable bands (top and bottom) that you can replace with accessory bands sold separately. Note that to switch between small and large bands, only replace the bottom band.
To remove and replace a band:
- Turn over your watch and find the band latches.
- To release the latch, slide the flat button toward the band.
- Gently pull the band away from the watch to release it.
- Repeat on the other side.
- To attach a band, press it into the end of the watch until you feel it snap into place. The band with the loops and peg attaches to the top of the watch.
Fitbit Versa, Fitbit Versa Lite Edition, and Fitbit Versa 2 have 2 detachable bands (top and bottom) that you can replace with accessory bands sold separately. Note that to switch between small and large bands, only replace the bottom band.
To remove and replace a band:
- Turn your watch over and find the quick-release lever.
- While pressing the quick-release lever inward, gently pull the band away from the tracker to release it.
- Repeat on the other side.
- To attach a band, hold the band at a 45° angle and slide the pin (the side opposite the quick-release lever) into the notch on the watch. Attach the band with the clasp to the top of the watch.
- While pressing the quick-release lever inward, slide the other end of the band into place.
- When both ends of the pin are inserted, release the quick-release lever.


- Regularly clean your band and wrist—especially after working out or sweating. Clean the band with a soap-free cleanser (like Cetaphil). Don’t use hand soap, body soap, dish soap, hand sanitizers, cleaning wipes or household cleaners, which could get trapped beneath the band and irritate your skin. Always dry the band and your wrist well before putting it back on. We recommend that you allow your band to air dry.
- The materials used in our leather, metal, knit, or woven accessory bands are intended to be worn during normal daily activity and not during high-intensity workouts or sleep. In general, these bands are not water-resistant or splashproof. They shouldn’t be soaked when cleaned; instead, dampen a cloth with water to clean these bands. Don’t store these bands in direct sunlight, at high temperatures or in humid conditions, as that may cause discoloration or damage over time.
- To minimize the risk of discoloration to our lighter colored and leather bands, avoid prolonged, direct contact with dark-colored clothing, as color transfer may occur.
Fitbit app
Make sure your wrist setting in the Fitbit app matches the wrist you wear your device on (dominant or non-dominant).
- Tap the Today tab
and tap Devices
.
- Tap your device image.
- Tap Watch Preferences
Wrist Preference